
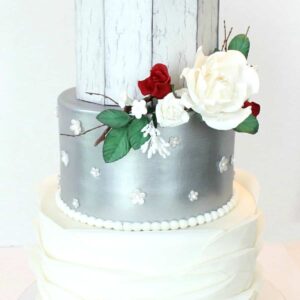
Creating the perfect cake or cookies takes more than just culinary skills; it also demands an artist’s touch. One particular artistic element that can truly make your baked goods stand out is icing. And not just any icing, but silver icing. This sparkly embellishment adds a magical touch to any dessert and is ideal for celebratory occasions like weddings, anniversaries, or holidays. In this comprehensive guide, we’ll take you through the steps of creating exquisite silver icing for your confectionery creations.
Understanding the Basics: Icing vs. Fondant
Before diving into the specifics of making silver icing, it’s crucial to understand the basics. You might be familiar with two common decorative elements used in baking – icing and fondant. These terms are often used interchangeably, but they are, in fact, different.
Icing, or frosting, is a sweet, creamy spread typically made with sugar and a liquid, such as water or milk. It can be easily tinted with food coloring, making it a versatile choice for decorating a variety of baked goods.
Fondant, on the other hand, is a type of icing that can be rolled out into a smooth, flat sheet. It’s often used to cover cakes for a sleek, polished look. Fondant can also be sculpted into shapes, making it ideal for creating more intricate designs.
Both icing and fondant can be turned silver, but the methods used will differ. In this blog, we’ll focus on how to create silver icing. But don’t worry, if you’re a fondant enthusiast, the same principles for achieving a silver color apply.
Getting Started: The Right Ingredients
For the Icing:
You can use either royal icing or buttercream as your base. Royal icing, made from powdered sugar, egg whites, and a dash of lemon juice, dries hard and smooth, making it perfect for more intricate designs. Buttercream, a mixture of butter and powdered sugar, stays soft, which is great for a more textural finish.
For the Silver Color:
The most common way to achieve a silver color is through the use of food coloring and luster dust. Silver food coloring is available but might not give you the metallic sheen you’re after. Instead, most professional bakers start with gray icing and then add luster dust to achieve a shiny, silver finish.
Here’s what you’ll need:
- Gray food coloring
- Silver luster dust

- Vodka or lemon extract (optional)
Now, let’s dive into the steps you need to follow to make your silver icing.
Step-by-Step Guide to Making Silver Icing
Step 1: Prepare Your Base Icing
First, you’ll need to prepare your icing. Whether you choose to use royal icing or buttercream, ensure you follow the recipe accurately for the best results. Once your icing is prepared, it should be a blank, white canvas ready to be tinted.
Step 2: Tint the Icing Gray
Next, gradually add gray food coloring to your icing. It’s important to do this slowly and in small amounts as food coloring is quite potent. Adding too much at once can lead to an overly dark shade.
Stir the food coloring in well, ensuring that the color is evenly distributed. Remember, the color will develop over time, so it might be best to wait a few minutes after mixing to see the true color.
Step 3: Add the Luster Dust
Now comes the magical part – transforming your gray icing into sparkling silver. For this, you’ll need silver luster dust. Luster dust is a type of decorating powder used in cake and candy decorating to add a metallic sheen.
To apply the luster dust, you can either sprinkle it on top of your already iced baked goods or mix it with the icing.
For a more subtle, overall silver look, mix the luster dust directly into the icing. Use a clean paintbrush to pick up some of the luster dust, then mix it into the icing. Start with a small amount of dust, as it’s easier to add more if needed than to take it away.
If you want a more dramatic, shiny finish, you can create a paint with the luster dust and vodka or lemon extract. The alcohol will evaporate as it dries, leaving behind only the shiny luster dust.
Step 4: Apply Your Silver Icing
Once your silver icing is ready, you can apply it to your baked goods. For a smooth application, consider using an icing spatula or a piping bag. Once the icing is applied, you can add another layer of luster dust if you want to intensify the metallic shine.
Tips and Tricks for Making Perfect Silver Icing
- Always start with less: Whether it’s food coloring or luster dust, always start with a smaller amount than you think you need. You can always add more, but you can’t take it away.
- Give it time: Colors can take time to develop. After adding your food coloring or luster dust, wait a few minutes to see the true shade before adding more.
- Practice makes perfect: Achieving the perfect shade and shine might take a few tries. Don’t be discouraged if your first attempt isn’t perfect.
- Safety first: Always ensure that the food coloring and luster dust you’re using are edible and safe. Not all craft supplies are suitable for use on food.
Making silver icing can seem challenging at first, but with the right ingredients, steps, and a little patience, you’ll soon be decorating your baked goods with a beautiful, metallic finish. Whether you’re making a wedding cake, anniversary cupcakes, or just fancy cookies, silver icing will add that extra bit of sparkle to your creations. Happy baking!